
You just picked up GameMaker Studio 2 and you want to make your first game.
Well, Pong is the perfect project to start with.
Here’s what you’ll learn in this tutorial:
- GMS2 basics: sprites, objects, rooms, events, layers and more
- How to make objects move and collide with each other
- How to get input from the player through the keyboard
- How to create a very simple AI (the paddle on the right is controlled by the computer)
- How to use a few built-in functions and variables: clamp, random_range, room_height, sprite_height and more
- How to use instance specific creation code
- How to use alarms
Prerequisites: I’ll assume you already know some basic concepts of programming. I’m not going to explain in detail what variables, functions or if-statements are.
Version used: 2.2.5, using GML
Estimated duration: 45 minutes
Alright, let’s learn how to make Pong with GameMaker Studio 2!
Contents
Set up
First, download the assets here and extract them somewhere.
You’ll also need GameMaker Studio 2 (free trial version or any license).
Then open up a new GML project in GMS and save it somewhere.
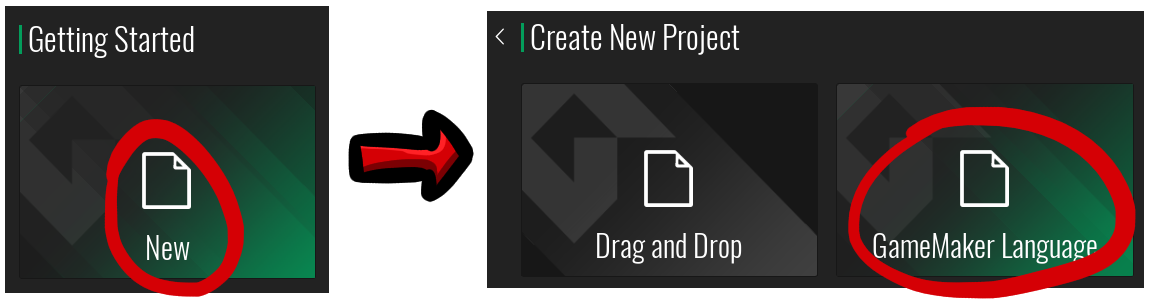
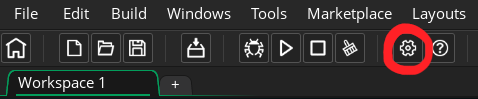
After that, make sure the game is set to run at 60 frames per second.
Click on the Game Options button in the top left of your screen.
In the window that just popped up, change the frames per second to 60 and click Apply.
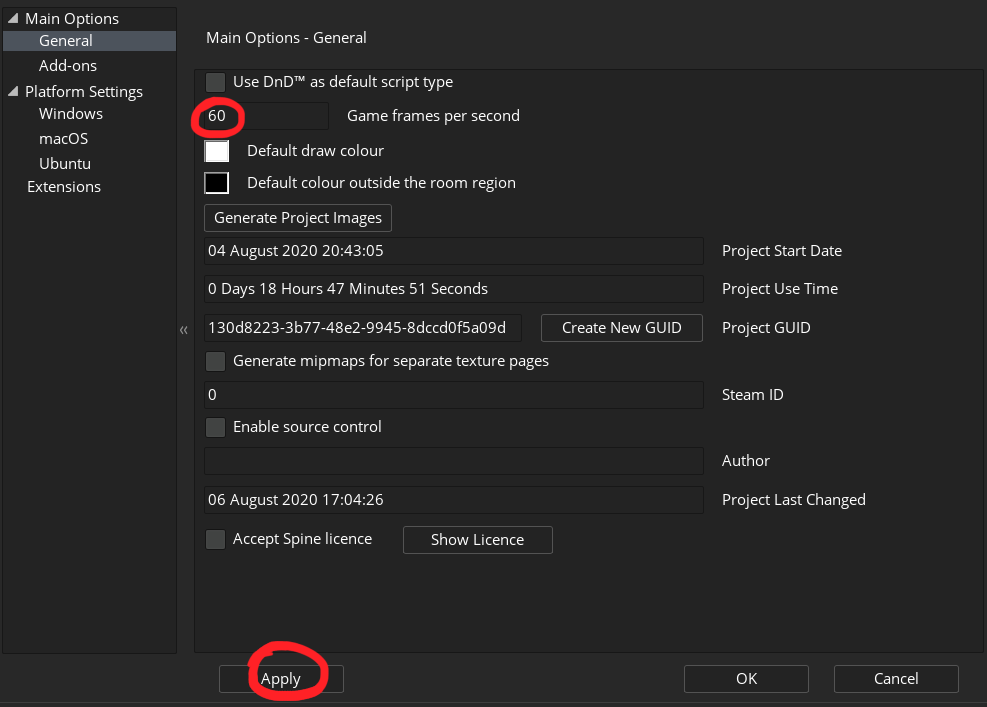
Now close that window and we’re good to go!
Let’s make Pong!
Importing an asset
The first thing we’ll do is import the assets.
You can see there’s a Resources tab on the right side of your screen.
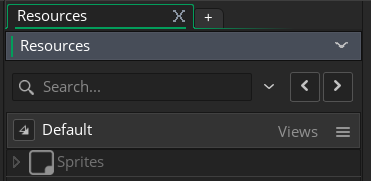
Right click on Sprites, and select Create Sprite From Image(s).
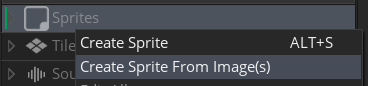
Then select the file named paddle.png.
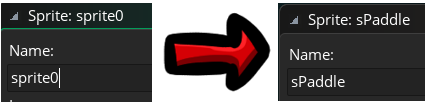
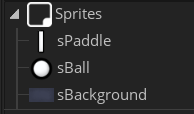
Name the newly created sprite sPaddle (it means sprite + paddle).
Changing the origin
In the middle of the sprite window, you can see that the Origin is set to 0x0 and Top Left.
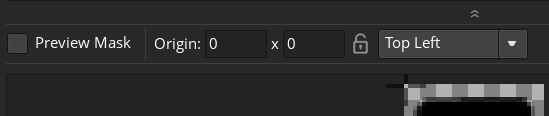
This is the point we’ll use to know where the object is positioned in the game.
It also means that if we rotate the object, it’ll rotate around this point.
It’s currently set to Top Left but in our case we want it to be in the center of the image.
So click on the scrolling menu and choose Middle Centre.

You’ll now see that the origin point is in the center of the image, and that its coordinates have been updated.

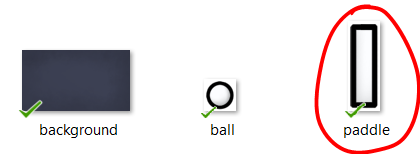
Now, repeat the process with the ball.png and background.png files.
You should have 3 sprites inside of your project with centered origin points.
Setting up the room
The room screen
We’ll now create the room where our game will take place.
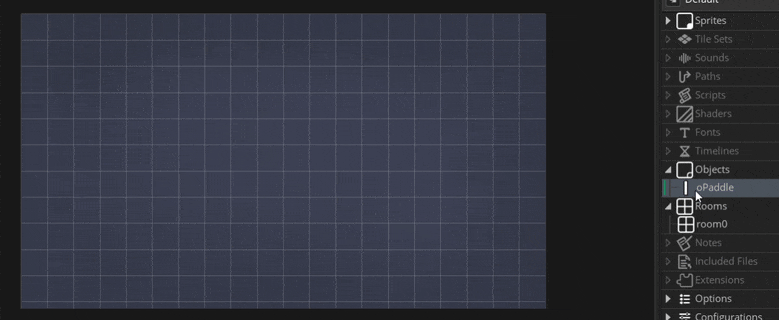
Look at the Rooms section in the Resources tab on the right of your screen.
If you click on it, you should see there’s already an item inside of it called room0.

Double-click it and you’ll be taken to a screen that looks like this.
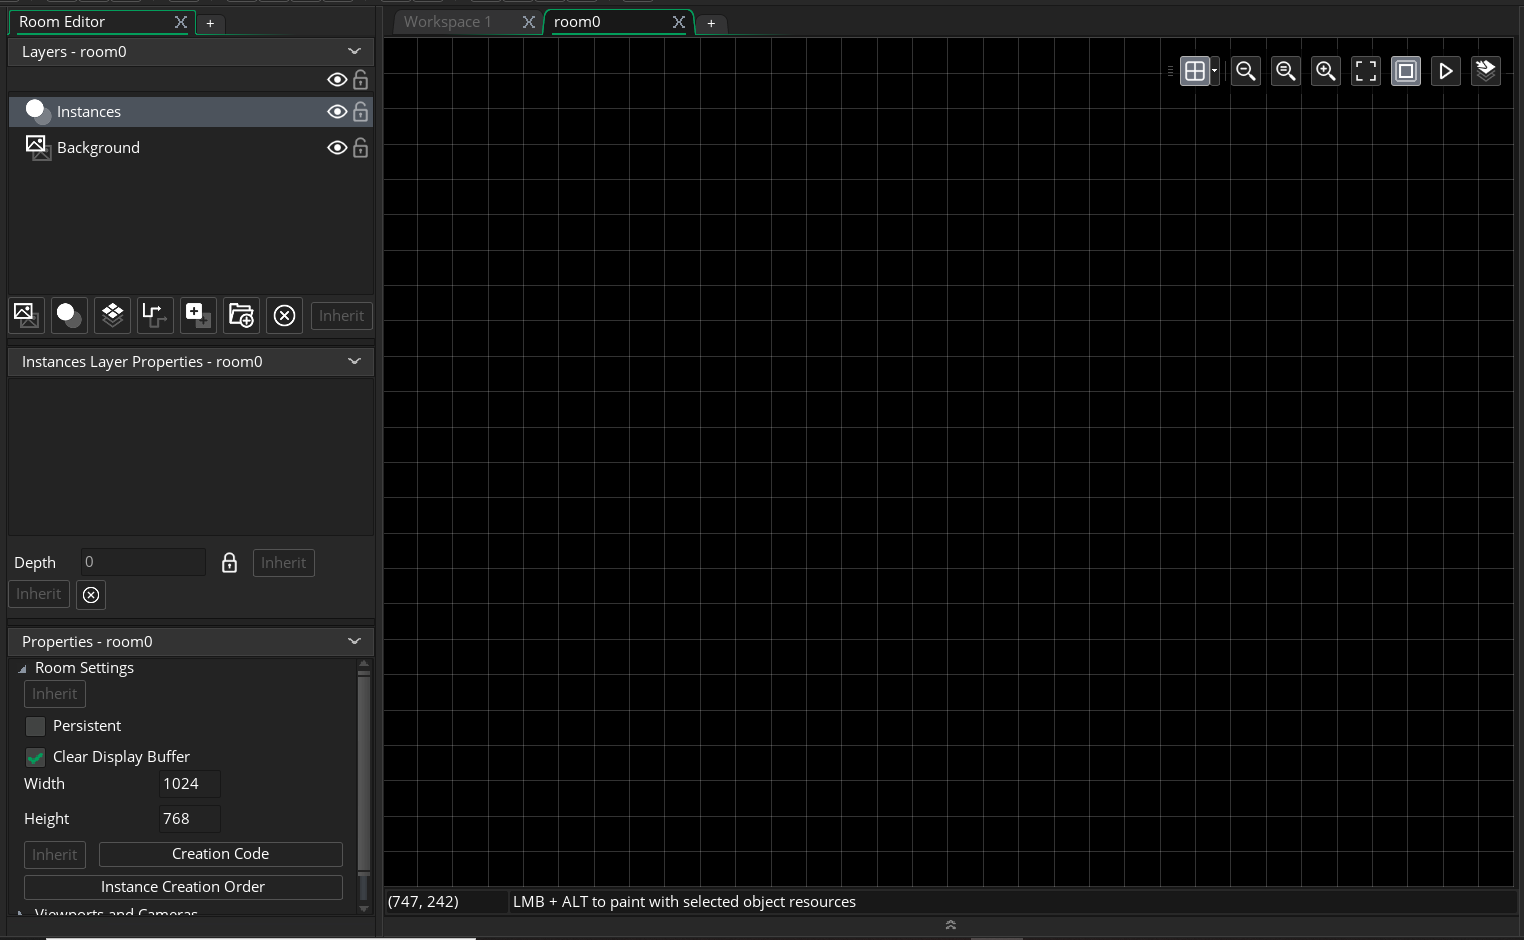
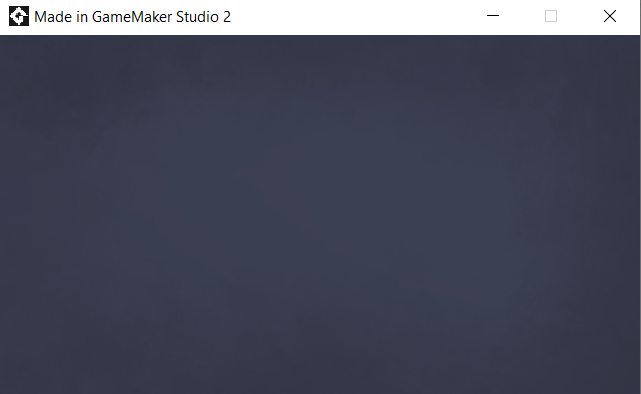
This black screen is where everything in our game happens. Actually, we can launch our game right now!
Testing your game
Click on this button in the top left of your screen or hit F5.
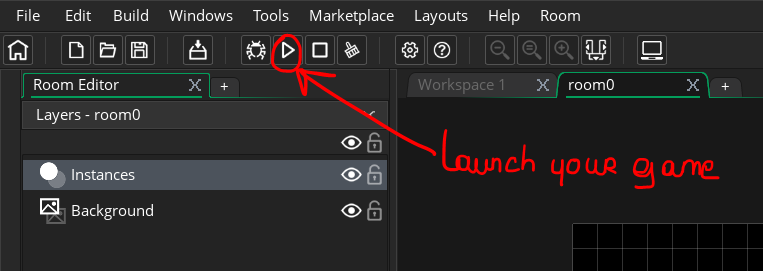
All you’ll see for now is a black window opening up called Made in GameMaker Studio 2.
Our game is currently empty, but it won’t stay that way for long.
For now, close the game window and return to the previous room0 window.
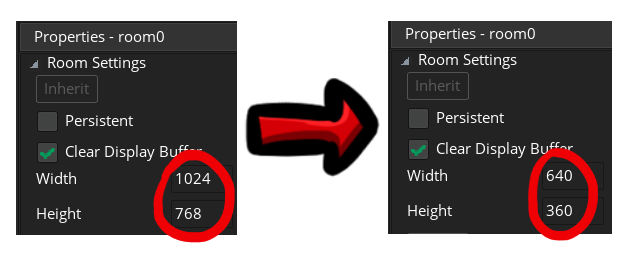
Resizing the room
To start with, we’ll resize our room. Look at the Properties tab in the bottom left corner of your screen.
Here you’ll see some boxes called width and height, currently set to 1024 and 768.
Change those to 640 and 360.
Adding the background
Next, look in the top left corner of your screen.
You’ll see the Room Editor window, and just below that the Layers of our room.
Everything we’ll add in our game will be placed on those layers.
We use layers to know which things should go in front or behind other things. For example, here we’ll put our paddles in front of our background.
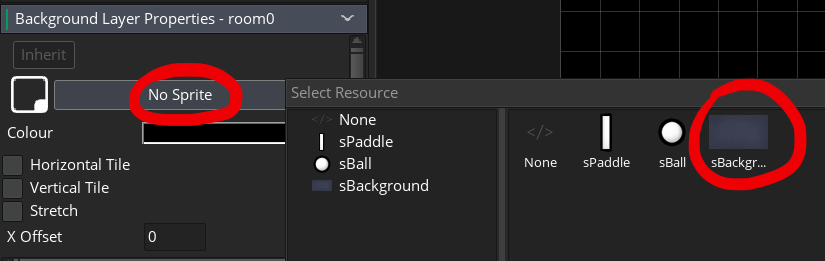
Let’s add our custom background image to replace that ugly black background.
Select the Background layer.

You’ll see some more info appear below it in a tab called Background Layer Properties – room0.
We can see that our background is currently black and that it has no sprite.
We want to use our sBackground sprite to replace the black color.
To do that, click on the No Sprite button and select our sBackground sprite.
If you launch the game (using that button from earlier or F5), you’ll see that we now have our game running in a tiny window with our background!
It’s now time to add our paddles and to do some coding!
Adding the paddles, part 1
Creating an object
Look on your right, in the Resources tab.
Just above the Rooms category, there’s a grayed out Objects category.
Right-click on it and select Create object.

This window will appear in the middle of your screen.

Wait… what even is an object?
Let’s stop for a second and think about this. What is an object?
We added our sprites before, but they’re just images. They can’t move or interact with the world around them.
Think of it like if we removed the skin from your bones and threw it on the ground. It kinda looks like you, but it can’t do anything.
To give it the ability to move, we need to add a body and a brain to the skin. This is what an object is.

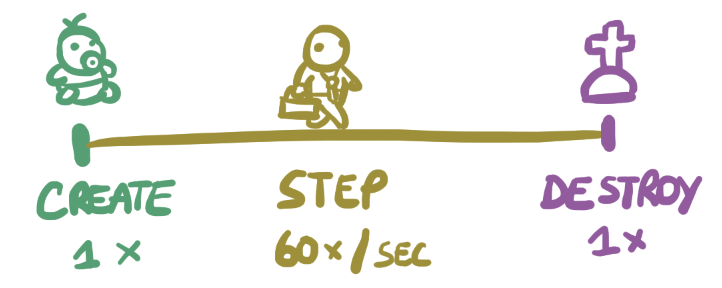
The Create Event
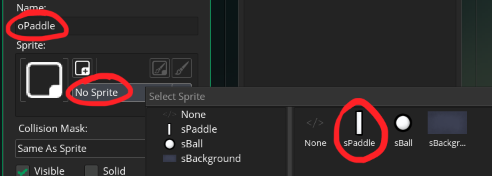
First, rename our object to oPaddle and assign it the sprite sPaddle by clicking on the No Sprite button.
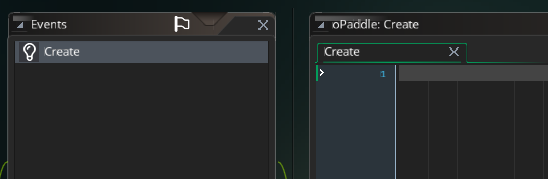
Then under the Events tab (the right box next to the one we just tweaked), click on Add Event and select the first one called Create.
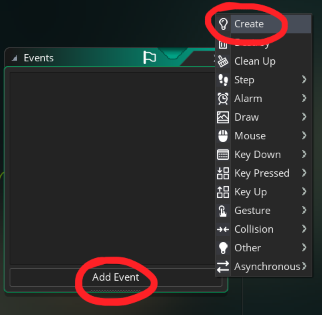
Events are where we’ll write the code that controls our object.
When an event happens, the corresponding code is executed.
Here, we chose the Create event.
It means that the code we’ll write inside of it will be executed as soon as our paddle is created.
By the way, you can use the middle mouse button to move your screen around in the workspace. You can also use CTRL + scroll wheel to zoom or dezoom.
Alright, so we need to add instructions to teach our paddle how to play pong. How do we do that?
First, we know that it needs to be able to move.
Type this in your Create event.
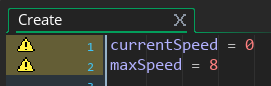
We just created 2 variables:
- currentSpeed: keeps track of what the current speed of the paddle is.
- maxSpeed: the speed at which the paddle will move later on.
Note: in GML putting semicolons at the end of the lines is optional
Adding the paddles, part 2
The Step Event
Alright, now we need a way to modify the current speed of the paddle when we press the UP and DOWN arrow keys on our keyboard.
To do that, we’ll add a new Event called the Step Event.
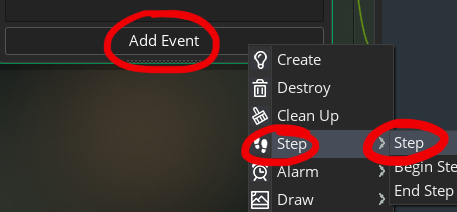
Whereas the Create event is run only once when the paddle is created, the Step event will run 60 times every second.
Think of the Create event as the birth of our paddle and the Step event as its day-to-day life.
In this event, we need to check if the user is pressing the arrow keys.
If they’re pressing the UP arrow, we’ll move our paddle up. Same thing for the DOWN arrow.
Getting the player’s input
To do that, we’ll use a function called keyboard_check().
We give it the key we want to check and it’ll return whether it’s pressed or not. Pretty neat!
The UP arrow key’s name is vk_up, the DOWN arrow is vk_down.
It means keyboard_check(vk_up) will return TRUE if we’re currently pressing the UP arrow key and FALSE otherwise.
If it returns TRUE, we want to move our paddle up. How do we do that?
Every object we put in our room has x and y coordinates.

So if we want our paddle to go up, we just have to lower its y value.
And we’ll lower it by the maxSpeed amount we defined earlier in the Create event.
Putting it all together
Here’s what we’ll write in the Step event:

Note: if you want to use WASD controls, replace vk_up by ord(“W”) and vk_down by ord(“S”)
This is the translation into code of everything we’ve been saying before.
- If we’re pressing the UP key, we set our currentSpeed to -maxSpeed. It needs to be negative so the paddle goes up in the y axis.
- If we’re pressing the DOWN key, we set our currentSpeed to maxSpeed. This time it’s positive so the paddle goes down in the y axis.
- If we’re not pressing anything, we reset the currentSpeed to 0.
- After all this, we update the y position of our paddle by adding the currentSpeed value we calculated.
Since this event is running 60 times per second, our game is constantly checking if the user is pressing a key and updates the paddle’s position accordingly.
Testing our paddles
Adding the paddles
Alright, let’s test this.
Go back to your room0 window and make sure the Instances layer is selected (and not the Background layer we were working on earlier).
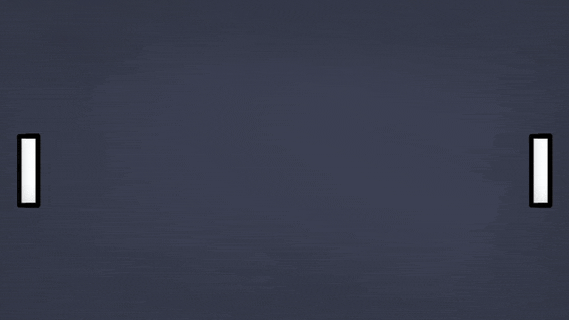
Then just drag and drop our oPaddle object and place two of them in the room like so.
Launch your game (press F5) and tada! You now have two paddles that you can move up and down with the arrow keys.
We can see there’s an issue where our paddle can disappear at the top or at the bottom of the room.
clamp saves the day
We can fix that with another function: clamp.
clamp takes a value and forbids it from going under or over some other values.
So here we’ll give it the new y position of our paddle and make sure it stays between 0 and our room height.
Go back to oPaddle in the Workspace and replace the last line of the Step event with this:

Note: room_height is a built-in variable that returns the height of the current room. Every built-in variable will be highlighted in green in the editor
Test it again. It works, but there’s still a problem there.
We can see that half of our paddle can still go out of the room… why is that?
The mystery of the Half Paddle
Remember how we set the origin point of our paddle to Middle Centre?
With this code, we’re only checking that the middle of our paddle doesn’t go out of the room.
So we need to add half the size of our paddle in both directions using the sprite_height built-in variable.
If the middle of our sprite is at the position y = sprite_height / 2, it means the top of our paddle is hitting the top of the room. Same principle for the bottom of the room.

Adding the ball
The Create Event
We’re now going to add the ball.
Create another object, call it oBall and assign it the sBall sprite.
When the ball is created, we want it to go in a random direction.
So add a Create event and write this code inside of it:
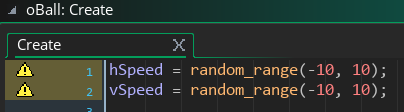
- hSpeed (for horizontal speed) controls the movement of the ball on the x axis
- vSpeed (for vertical speed) does the same on the y axis
- random_range is a function that’ll return a random number between the two numbers we give it
The Step Event
Then we’ll apply that movement in the Step Event, just like for the paddles.
But we also want the ball to bounce if it hits a wall, so we’ll have to add some additional code.
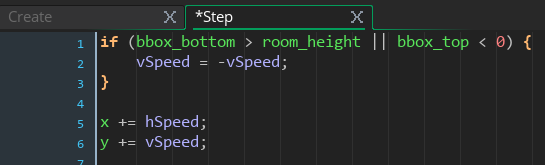
Note: The || operator means “or”. So if either of those conditions returns TRUE, we’ll execute the code inside the brackets.
bbox refers to the collision mask of our sprite. bbox_top is the top of that mask and bbox_bottom is the bottom.
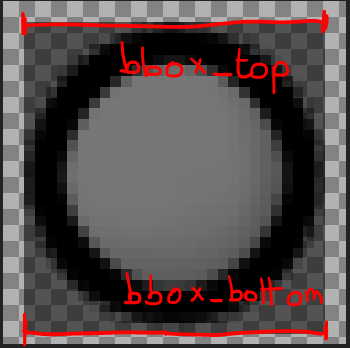
(you can see this yourself if you go the sprite and click on Collision Mask on the left of the window)

So our code checks if the bottom of our ball touches the bottom wall.
If it does, we reverse the vertical speed of the ball, effectively making it bounce. (same for the top)
If we just used y instead of bbox_bottom, half of our ball would go outside the room before it changes direction. (just like for our paddles)
The left and right walls
Now the ball will bounce on the top and bottom walls.
But we also need to tell it what to do if it reaches the right and left walls.
When that happens, we want it to respawn in the middle of the room with a new randomized direction.
So add this code in the Step event:

You should be able to understand this code as it only uses things we’ve seen earlier.
Bouncing on paddles
There’s one last missing piece: we need to make it bounce on our paddles.
For that, we’ll need to add a new event that’ll be executed when the ball touches a paddle.
So click on Add Event, choose Collision and oPaddle.
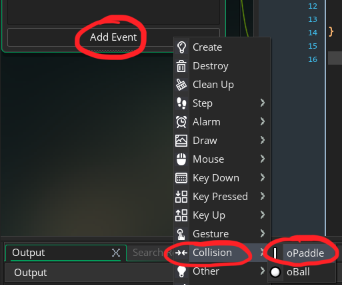
Simply add this line of code inside the event.

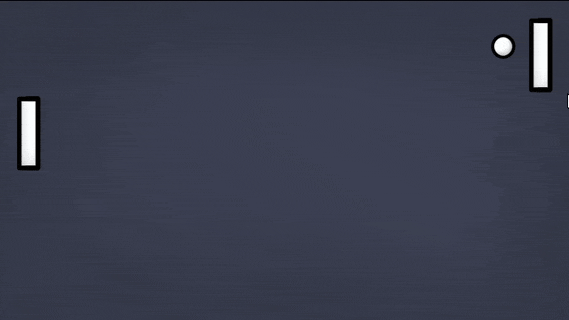
Now go back to your room editor and place the ball in the middle of the room, just like you placed the paddles.
Launch the game and you should have a working pong!
Adding the AI
Instance Creation Code
We don’t want to be playing against ourselves all the time so let’s add an AI.
But how can we differentiate our paddle from the AI’s paddle?
We can use the Instance Creation Code feature. This allows us to add code in the Create event of a specific instance only.
To do that, first go back to the Create Event of oPaddle and add this line of code:

By default, all of our oPaddle instances will have the isAI variable set to FALSE.
Now go in your room window and double-click on the right paddle.
In the window that has been opened, click on Creation Code button and add this code.

Now, our right paddle has the isAI variable set to TRUE and our left paddle has the isAI variable set to FALSE.
We’re going to use this variable to modify how our paddles move.
The Step Event
So go to the Step event of oPaddle and put the code that checks for player input inside an if / else statement:
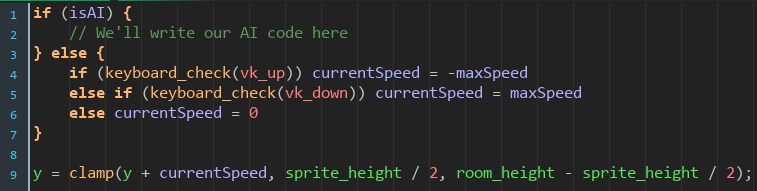
Note: the last line is out of the if / else statement because we need to update the position of the paddle in both cases
This way we can separate the AI’s code from the player’s code.
We can start by making a simple AI that follows the ball.

It works okay, but we get this shaky boy when the ball’s vSpeed is low enough:

We’ll fix that in the next part.
Fixing the AI
Ultra Smart Pong AI, part 1
Let’s make our AI look a bit more natural.
There are many ways to do so. We’ll pick a simple solution.
Instead of making the paddle follow the ball’s position, we’ll give it the following instruction:
If the ball is higher than the paddle, move the paddle up to a random position higher than the ball (within the limits of the room).
Same concept if the ball is lower than the paddle.
First, let’s add a destination variable in the Create event of the paddle and initialize it to the middle of the room.

Then, we need to update the code in the Step event.
First, replace oBall.y with destination.

Then we need to add the code to update the destination once the paddle has reached it.
Ultra Smart Pong AI, part 2
Let’s do this in a few steps.
First, let’s declare a local variable that checks whether the paddle has reached the destination or not.
Note: we’re still within the if (AI) statement.

If y is within maxSpeed of the destination, reachedDestination will return TRUE.
Next, let’s set up two more variables for clarity purposes:
![]()
Now that all of our variables are set up, we can add the code that updates the destination.

We’re using our trusty old clamp function again to avoid entering into the walls.
You can tweak the number 150 used in the function irandom() as you wish. It’ll slightly modify the movement pattern of the paddle.
Note: the function random() picks a random number including decimals while irandom() only picks integer numbers.
That should get rid of the shakiness. Test it again and make sure it fixed the issue.
Fixing the Stuck Ball
Our dirty solution, part 1
Next: another issue we have is that the ball often gets stuck on our paddle when it comes from its top or bottom sides:
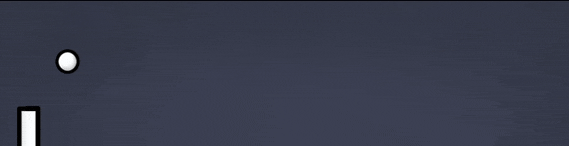
It happens because our ball keeps bouncing back and forth within ou paddle.
To fix it, we’ll use a quick and dirty solution and make it so the ball can only bounce on a paddle once every second.
Let’s add a canPushBall variable in the Create Event of oPaddle.

Next we’ll add an Alarm event in oPaddle.
An alarm is a countdown timer that gets triggered when it reaches 0.
By default, it’s set at -1 so it won’t trigger until we want it to.
We’ll use it to reset the canPushBall variable to TRUE 1 second after the ball has touched a paddle.

Put this code inside of it:

Our dirty solution, part 2
Next, we’ll go in oBall in the Collision event. Replace the code with this:
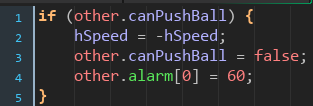
Here, other refers to the oPaddle instance we’re colliding with.
If the paddle can push the ball:
- We make the ball bounce.
- We set the canPushBall variable to FALSE.
- And we set its alarm to 60 which will reset canPushBall to TRUE after a second.
The problem should now be fixed. Test it again and make sure everything is working.
Making Pong more fun
Speeding up our ball
At this point, the game is functional.
But it can be a bit boring, especially when the ball has a trajectory that looks like this:
So let’s tweak the code a bit to fix it. We’ll forbid the ball to have a speed lower than 5.
Replace the hSpeed randomization in oBall’s Create and Step event with that line:

Push the ball harder
We can also speed up the ball when it bounces on a paddle to make it more dynamic.
Go to the Collision event and replace the simple hSpeed reversal with this line of code:

We’re using clamp again to keep it from going lightning fast, which would create new issues such as flying through our paddles.
Note: if you want to increase the maximum speed of the ball, make sure to also decrease the duration you set the Alarm event to. If you don’t and the ball takes less than a second to go from one paddle to the other it’ll break our dirty little trick from earlier.
And voila! A fully functional pong.

Conclusion
There are many ways we could improve it, such as actually calculating the bouncing angle of the ball so it doesn’t always go the same way or adding sound effects.
But this is beyond the scope of this tutorial.
I want to keep it manageable so we’ll stop here for today.
Congrats if you managed to complete the tutorial! You just made your first game in GameMaker Studio 2!